The in-depth knowledge and how to solve related issues
This tutorial will explain the in-depth of 3D surface Normal and gives you the basic knowledge in all the settings related to blender 3D software surface Normal, and gives you the best tricks on how to solve all Normal related issues/problems.


A normal is an object such as a line or vector that is perpendicular to a given object. For example, in two dimensions, the normal line to a curve at a given point is the line perpendicular to the tangent line to the curve at the point.
In three dimensions, a surface normal, or simply normal, to a surface at a point P is a vector that is perpendicular to the tangent plane to that surface at P.
How does Normal concerns modelling in blender software?
Since modelling deals with surfaces, the need to have the knowledge of Normal arises.
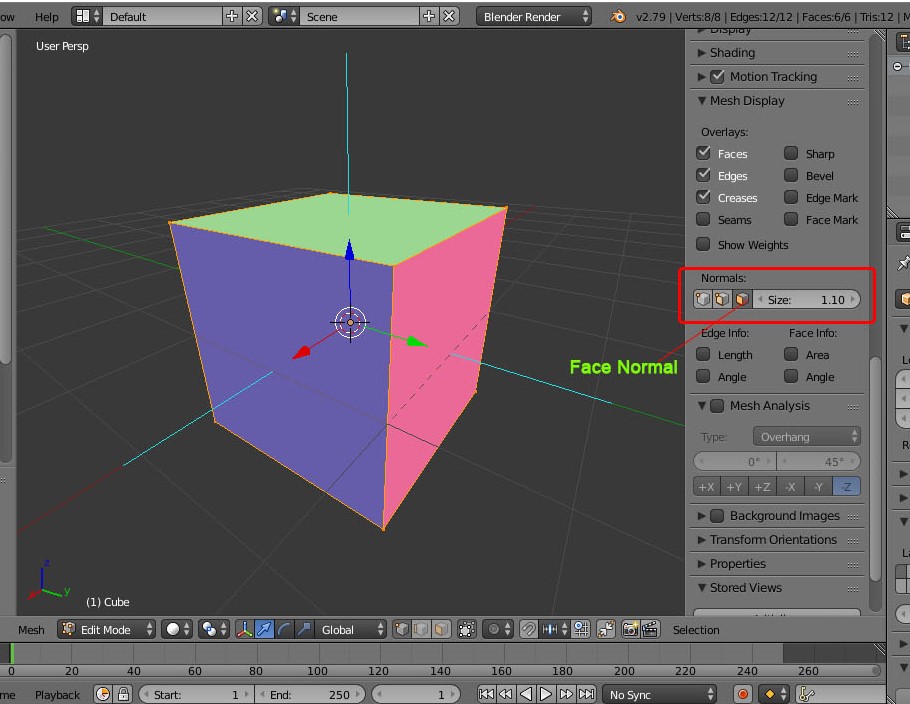
To check the Normal of your default cube or any object in blender, select the object and switch to Edit Mode.

Press ‘N’ (or go to View and select Properties) to show the Properties. Scroll down to Mesh Display>Normals

Click on the Vertex Normal and increase the Size in the option and see the magic. Blue lines appears, and that is the visual representation of Normal lines at the Vertex.

Toggle off the Vertex Normal and click on the Face Normal, the Normal lines are displayed perpendicular to the surfaces.

If you rotate your object, the normal is still maintaining its perpendicular to the surfaces. No matter your transformation, the Normal will still align to the transformation in order to maintain its perpendicular.

Because the Normal is seen outside, it simply indicates that the Normal is at the Face we can see. Lets try and Flip the Normal in order to better understand this Surface Normal.
Go to Mesh > Normals > Flip Normals
You will notice that your Normal line disappears, and the colour of your cube becomes darker at one face.
The Normal though not seen, doesn’t disappear. What happened is that the Normals has been shifted to the back of your Surface instead of staying at the face of your Surface.

To make the Normal to come back to the face of the Surface, we can Flip the Normal (Note: Fliping the Normals is not the best option when dealing with complex models). This is the reason why I want to introduce you to Recalculate Outside and Recalculate Inside.
To Recalculate the Normals based on the geometry of the surfaces,
Goto Mesh > Normals > Recalculate Outside,
The Normal lines will be recalculated based on the geometry surfaces, and the Normal lines will appear perpendicular to the faces again.

Now, lets look at other things we can do or achieve with this Normals,
Toggle off the Normal Display
Then go to Mesh > Normals > Flip Normals
You will notice that some faces are dull while some faces are brighter (Note: You can only notice that in Edit Mode).
To counter the issue off bright and dull areas and to make all the faces have the same colour,

Go to Properties Window, click on Data-Block,
Under Normals, click on Double Sided.
If you have followed this tutorial correctly, you will notice the change in your object colour.


You’ve made some decent points there. I looked on the net to find out more about the issue
and found most individuals will go along with your views on this website.